So, what is this HDR business?
Have you ever taken a picture where you have to "sadly" decide if either you go with a washed out sky or a dark subject? A typical case is when you have a subject with backlight (meaning the main source of light is behind your subject and hence in front of your camera). You have to either decide if you go with an almost "all white" sky in order to show the detail on your subject, or darken your subject in order to keep a nice sky. This is specially painful when you have a very nice and meaningful sky, that would make your composition much better. In the general case you just have parts of your picture that are too dark and others too light for your camera and hence you cannot cover the whole range the subject has. Here is where a High Dynamic Range Photography comes into play, so we can capture a larger range and have most (or at least more) of our picture with the correct exposure.
To show how this works let's go over a couple of examples.
This first picture is from the chapel right next to St. John the Divine Cathedral, here in New York. Although in this picture part of the road and the snow appear to be in the correct exposure, the sky is completely washed out, and the chapel itself is relatively dark.

The following picture shows how nice and dramatic was the sky that day, by taking the previous picture with -2 stops of exposure. The problem is that if we have the correct exposure to show this wonderful sky we end up with an extremely dark picture and now we can see even less of the chapel as before.

On the other hand, if we try to improve the exposure of the chapel, and highlight its features, we lose that dramatic sky.

This other picture, taken at Zion National Park in Utah, has a similar problem. Although the sun is not in front, the sky is clearly too white when we try to have the river in the correct exposure. At the same time, the stones become too dark and can barely identify their texture.
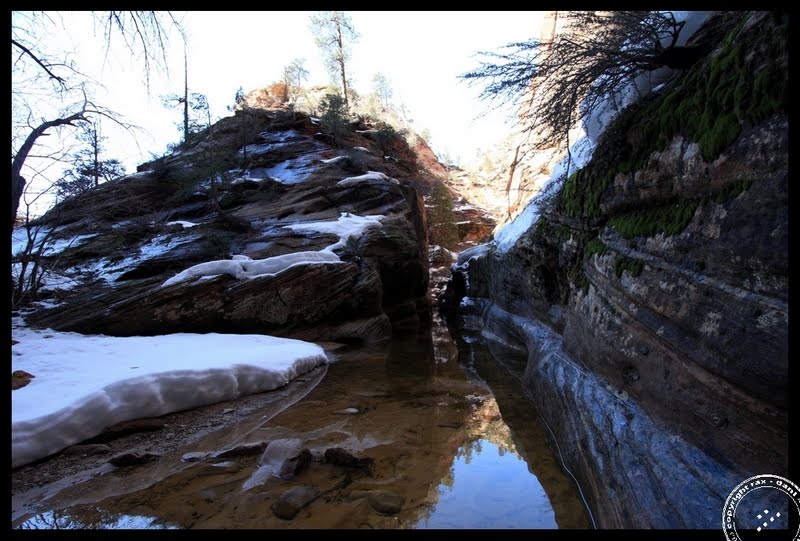
Again, if we take a darker or lighter picture we will be able to "save' only parts of the picture, but never obtain an overall nice picture.


One solution for these situations is to go the HDR way. What you do in HDR Photographs is basically grab these 3 (or sometimes many more) pictures, all exposed at different levels, and combine them to create a picture that has "correctly exposed" most of what you see in it.
Here is the result of doing such a procedure on the images above:


Much cooler pictures right? Well, not everybody loves these things so the answer is not always yes :D. Plus it is really easy to go overboard with the processing and end up with really ugly results. In this Album you can see some of the results I've obtained playing around with this technique. Some look kind of natural and cool as everything looks fine, but others end up with a very unnatural sky or a greyish colour over them. As I'm not an expert on the subject (nor on the programs I used to make these HDR pictures) it must definitely be my fault, but I still will post some of my findings so you can do your own pictures.
So... what do you need to make such images?
First, you need to find a subject that would require such a technique. Cloudy days are specially nice for this as the cloudy sky can give a lot of dramatism to your picture, but in order to have it at the correct exposure you will definitely have to underexpose your main subject. Hence, using HDR will highlight both, a nice sky and a nice subject.
Second important thing is a tripod. It is not mandatory (actually the river image you saw before was done without one), but it helps. As you can imagine, at some point you will need to put all your images one over the other, and in order to obtain any results you will have to align them. If you are taking them using your hand it is highly probable that you will shake a little (or even a lot if you need to change the camera setup after you take each image) and then alignment will become a painful process. Also as in general you use this technique for landscapes, you will have your camera with a really small aperture (f/22 or something similar) which will require longer exposures and thus a shaky hand can kill your image.
Depending on the camera you have is how easy this will be. Extremely simple point-and-shoot type cameras might not be able to achieve such a trick. You need at least to be able to control some properties like exposure time without the camera changing everything for you. So put your camera in manual mode, set your aperture to the desired value and move the speed until you see it has the correct exposure. If you don't know how to do this check your manual. A good tip that works with these cameras is to set the camera to Aperture Priority mode (Av in some cameras), set your desired aperture and see what the camera tells you is the correct speed. Then go back to your manual mode and set the same aperture and speed you saw before, and take your shot. Next, keeping your camera steady and the same aperture value, move up and down the speed and take pictures along. How much up, how much down? Depends on your subject. In general +2 -2 stops will be a nice range, but in some cases you might require much more. And sometimes you might require several pictures (not just 3) to cover all the exposure values and give nice texture to your image. Just play along and see what happens, this is one of those "learning by doing" experiences.
If you have a fancy camera on the other hand, chances are you already have the possibility of taking these images easier. Look your manual for something called "Automatic Exposure Bracketing". This function is generally used by photographers to take the same picture with several different exposures automatically in order to minimize the required post-production. In our case we can use that tool to automatically take our shots. In Canon cameras at least, you can take 3 shots by setting the AEB mode, where you select the size of your range (+ and - stops), and start shooting. If you are using a tripod, just set your drive mode to "2 second timer" and once you press the shutter button the camera will automatically take the 3 pictures. Now if you are using your hand as support, set the drive mode to H (high speed) and just press the shutter once, but keep it pressed until you hear the 3 shots are fired. If you have the drive more in the "normal" position you will have to press the shutter button 3 times and thus increase the chance that you will move or shake while taking your pictures.
Another advantage of fancy cameras is RAW mode. These cameras allow you to take pictures in a different (and larger) file format that contains much more information that the normal JPG ones you get with simpler cameras. When you make an HDR picture generally you will add a lot of noise to the image and at least what I've seen is that when you have the larger files of the RAW pictures you get better results and less noise than with the JPG ones, which already have a lot of noise due to the compression they suffer when saved.
Now that you have your set of pictures, you just need a software that allows you to merge them. Technically, what you saw before are not HDR pictures, but a mapping of an HDR into a "normal" picture. Real HDR pictures keep the information of all your exposures at the same time and you can move around seeing the "correct" exposure of each piece. In our case we will squash all those images into a single normal one that will highlight the correct information in the correct place. There are several programs to do this. The three I've used with nice results are Adobe Photoshop, Adobe Lightroom, and Photomatix. There are several excellent tutorials on-line to teach you how to do this with each program, so it doesn't make much sense to write a new one. Just Google for "HDR Tutorial" and you will find several of them.
Enjoy!